
Boat Anchors: How to Choose the Right Type
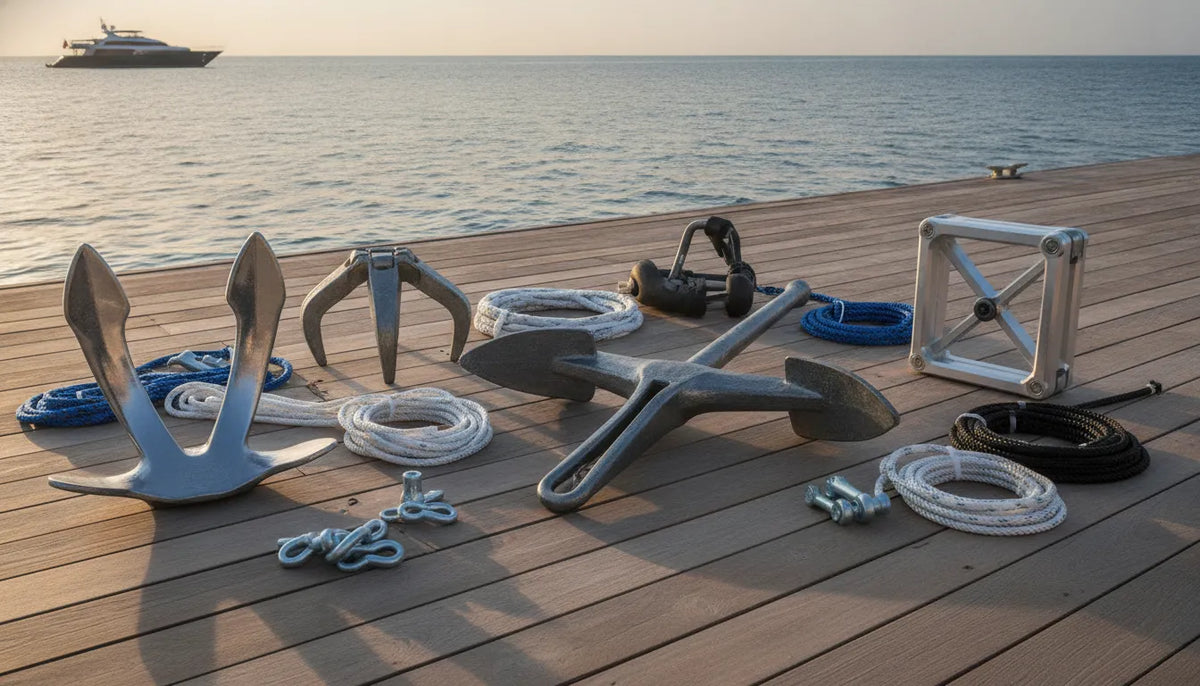
A reliable anchoring setup starts with the right equipment, but it doesn’t end at the bow. Your anchor needs to suit your boat and seabed. The rode must provide enough scope, and the anchor needs to be set and checked before you settle in. From comparing boat anchors to inspecting chain, rope, and connectors, each part contributes to a safer system. This guide breaks down what to consider before you buy, how to anchor with care, and how to maintain and store your gear. If a project calls for new marine equipment, Apollo Lighting’s team can also offer practical guidance for boat owners and professionals.
Key Takeaways
- Choose an anchor for your boat and usual seabed: Compare anchor designs and follow the manufacturer’s sizing guidance for your vessel and conditions.
- Build a compatible anchoring system: Check that the anchor, rode, connectors, and bow hardware work together, and plan rode length based on depth and bow height.
- Anchor with care and inspect gear regularly: Set the anchor gradually, confirm your position stays steady, monitor changing conditions, and check equipment before each trip.
What Are the Main Types of Boat Anchors?
An anchor’s shape affects how it catches the bottom, how well it holds, and how easy it is to retrieve. The seabed matters just as much: an anchor that digs into sand may struggle to catch in rock or thick grass. Before choosing one, consider where you usually boat, the size and design of your vessel, and how much room you have to store anchoring gear.
Common options include fluke, plow, claw, scoop-style, grapnel, and mushroom anchors. Each has strengths and limitations, so there isn’t one design that suits every boat or bottom. The different types of boat anchors provide a starting point for comparing their uses. Always check the anchor manufacturer’s guidance for vessel size and conditions, then consider how the anchor will work with your rode and bow setup.
Use fluke anchors on sand and mud
Fluke anchors, often called Danforth-style anchors, have two broad, hinged blades that dig into the bottom as the boat pulls against the rode. They can hold well in sand and mud, and their flat shape is convenient when storage space is limited. These features make them a common choice for small and medium-sized boats.
Fluke anchors are less suited to rocky or heavily vegetated bottoms, where the blades may not dig in securely. A significant change in wind or current can also pull an anchor free, so check that it has reset and is holding after the boat swings. Before buying, consult the manufacturer’s sizing recommendations and confirm the anchor fits your bow roller or storage locker.
Choose plow and wing anchors for mixed or changing seabeds
Plow anchors, including CQR and Delta styles, have a weighted, pointed shape designed to dig into the seabed. They can work across sand, mud, and some mixed bottoms. Many are designed to roll upright and reset if the boat changes direction, which can be useful when wind or current shifts.
Wing anchors are a related style, with a broad surface that helps the anchor orient and set. Performance varies between models, and rocky, weedy, or very soft bottoms can affect how well an anchor catches. Check the manufacturer’s recommendations for your boat and typical seabed, and consider the anchor’s shape when checking bow-roller compatibility and storage space.
Choose claw anchors for reliable setting and resetting
Claw anchors, sometimes called Bruce-style anchors, have a curved shape that helps them catch and set. They can work on several bottom types, including sand and mud, and some rocky areas. Many boaters choose them for their ability to reset after a shift in wind or current.
No anchor holds equally well on every seabed, so check the maker’s guidance for the specific model and your vessel. A claw anchor may also take up more room than a flat-stowing fluke anchor. Confirm that it fits your bow roller or anchor locker before purchasing. If you boat near coral or other sensitive habitats, follow local rules and choose an anchoring location that avoids damaging the bottom.
Use scoop-style anchors on suitable bottoms
Scoop-style anchors have a curved body designed to dig into the seabed under load. Many models are intended for sand and mud, though performance depends on the anchor’s design and the bottom conditions. Some are designed to reset if the boat swings, which may be useful when wind or current changes.
The term “scoop” covers different designs, so compare individual models rather than relying on the name alone. A folding box anchor is another option some boaters consider for sand or mud. Its square frame and teeth are designed to catch the bottom, and the frame folds for easier storage. Check the manufacturer’s sizing and seabed guidance, and make sure the anchor suits your boat and anchoring routine.
Choose grapnel anchors for small boats and rocky areas
Grapnel anchors have several folding arms that can catch on rocks and other irregular surfaces. Their compact design makes them convenient for dinghies, personal watercraft, and other small craft during brief stops. They may also be used to retrieve objects from the water, though that task is different from holding a boat securely.
The arms can snag firmly, which may make retrieval difficult. In sand or mud, a grapnel may not hold as reliably as an anchor designed to dig into those bottoms. Choose a grapnel sized for your vessel and intended use, and think through how you’ll free it if it becomes stuck. For longer stops or changing conditions, confirm that the anchor is appropriate for the location and setup.
Use mushroom anchors for permanent moorings in soft bottoms
Mushroom anchors have a rounded, cap-like shape that settles into soft mud or silt. As sediment builds around the anchor, it can develop holding power over time. This makes mushroom anchors more suitable for permanent or semi-permanent moorings in calm, protected locations than for frequent anchoring and retrieval during day trips.
Their effectiveness depends on the seabed, installation, and time allowed for the anchor to settle. They may not suit hard or rocky bottoms, or exposed locations with demanding conditions. Mushroom anchors can also be heavy to handle. For a fixed mooring, check local requirements and have the anchor and mooring system selected for the vessel and site.
Compare holding power, resetting, storage, and seabed limits
Start by considering the bottom you’re most likely to encounter, then compare how each anchor sets and whether it can reset after a change in wind or current. Check how the anchor fits your bow roller or locker, too. A compact design may be easier to stow, while a larger model may need more room and careful handling.
Review the manufacturer’s sizing guidance and limits for your vessel and conditions. Holding depends on more than anchor weight: the seabed, rode, scope, and a successful set all play a part. If your trips take you across different bottom types, you may want a primary anchor suited to your usual conditions and a second option for other locations. For help with related marine equipment for a boat project, explore Apollo Lighting’s marine products.
How Do You Choose the Right Boat Anchor?
Choose an anchor for the boat you have and the places you actually use it. Length is a useful starting point, but displacement, windage, seabed, weather, and anchoring habits all affect the setup you need. The anchor, rode, and bow hardware should work together, too.
Before you buy, consider where you anchor most often, how much room you have to store and deploy gear, and whether a second anchor would suit your trips. For help weighing your options, Apollo Lighting’s marine team can offer project-focused guidance on equipment for your boat.
Match anchor size to boat length, displacement, and windage
Use boat length as a starting point, then account for displacement and windage. A heavier vessel puts more load on its anchor and rode. A tall cabin, canvas, or enclosure can catch more wind and pull the boat harder, so two boats of the same length may need different anchor setups.
Check the sizing chart for the specific anchor model you are considering. As one general example, a guide lists an 8-pound fluke anchor for boats from 16 to 24 feet, and a 13-pound fluke or box anchor for vessels up to 32 feet. Sizing varies by design and manufacturer, so use the anchor sizing guidance for your chosen model rather than treating these figures as universal.
Check sizing charts and account for demanding conditions
Treat a sizing chart as a baseline, not a guarantee for every situation. If you anchor overnight or regularly encounter strong wind, current, or waves, check whether the manufacturer recommends a larger model or a different anchor design. Your boat’s bow shape and weight distribution also affect the load placed on the anchor as the boat swings.
A heavier anchor alone will not solve every holding problem. Anchor design, seabed, rode, and setting technique all play a role. If your boat’s size or conditions fall near the upper end of the chart, ask the manufacturer or a marine professional to review your setup. These anchoring recommendations also explain why conditions matter when choosing and using an anchor.
Match anchor design to your usual seabed
Anchor designs perform differently on different bottoms. Fluke anchors are commonly used on sand and mud, while plow, wing, and claw styles may suit a broader mix of seabeds. A grapnel anchor can work for small craft or rocky areas where it can catch, but its performance depends on the specific bottom. No single design works equally well in every location.
Think about where you anchor most often, then check charts, cruising guides, or reliable local reports for seabed information. Sand, mud, grass, rock, and coral each affect how an anchor sets and holds. If your trips take you across several bottom types, compare models against those conditions rather than assuming one anchor will perform the same everywhere. This overview of anchoring mistakes explains why anchor type and seabed should be considered together.
Consider boat use, weather, depth, and deployment space
Your routine should guide your choice. A boat that anchors briefly for a swim has different needs from a charter vessel that holds position for longer periods or a cruising boat that stays overnight. Consider the wind and current you typically face, the water depth, and whether you can safely lower and retrieve the anchor from the bow.
Check that the anchor fits your locker or bow roller and that you have room to handle its rode. Depth affects how much rode you need to let out. Measure the water depth and include the height of the bow above the water when planning scope. Tide and changing weather can affect the amount of rode needed, so account for local conditions before anchoring. These scope and anchoring tips can help you plan for a secure setup.
Decide whether your trips call for a second anchor
A second anchor can be useful if you visit different destinations, expect changing conditions, or want a backup in case your primary anchor is lost or damaged. It may also give you another option when a particular seabed or limited swing room calls for a different arrangement. Choose a backup that suits your boat and the places you travel, rather than simply buying a smaller version of your primary anchor.
Make sure you have room to store and deploy it without tangling the primary rode or creating hazards on deck. Check the sizing guidance for both anchors, and inspect their hardware regularly. An anchor that is too small for the boat may struggle to hold in strong wind or current, so consider the conditions you are likely to encounter when selecting a backup.
What Is an Anchor Rode, and How Do You Set It Up?
An anchor rode is the complete connection between your boat and its anchor. It typically includes rope, chain, and the hardware that joins them. Together, these parts help the anchor hold while allowing the boat to move with wind and waves. The right setup depends on your boat, anchor, windlass, and the places you usually anchor.
Before choosing or assembling a rode, check the recommendations from your boat, anchor, and windlass manufacturers. Consider the seabed, water depth, and weather you’re likely to encounter, too. A rode should be strong enough for the loads it may face, long enough to provide suitable scope, and compatible with your equipment. Inspect the whole system regularly, since worn rope, corroded chain, or a loose connection can compromise the setup.
The steps below explain the main rode components and how to prepare them. If you’re unsure about sizing or hardware ratings, ask a marine professional to review your setup before relying on it.
Know the parts: rope, chain, shackles, and connectors
Rope provides length and flexibility, while chain adds weight near the anchor and helps keep the pull angle low. Many setups combine galvanized chain with high-strength nylon rope. The right balance depends on your boat and anchoring conditions. Anchoring guidance describes a common scope range of about 5:1 to 7:1, with rode length compared against the vertical distance to the seabed.
Shackles and other connectors join the anchor, chain, and rope. Choose marine-grade hardware with a working load rating appropriate for your system, and secure it against accidental opening. Before each trip, check for corrosion, bent or worn parts, and loose pins. Replace damaged components rather than relying on them under load.
Choose the right rode material, diameter, and chain length
Nylon is commonly used for anchor rode because it stretches under load, helping absorb some movement from waves and gusts. Choose the rope diameter and construction to match your boat’s displacement and the anchor manufacturer’s recommendations. Three-strand and braided nylon are both used, but they handle and stow differently. Check that your choice works with the windlass, if you have one, and fits your anchor locker.
Select chain size and length to suit your anchor and boat. Galvanized chain is a common option for strength and corrosion resistance. More chain adds weight at the bow, so follow equipment guidance rather than choosing by weight alone. Check the rope-to-chain connection, including any splice or connector, and make sure it feeds smoothly through your windlass or bow roller.
Calculate scope from depth and bow height
Scope compares the amount of rode paid out with the vertical distance from the point where the rode leaves the boat to the seabed. Include both water depth and the height of the bow roller above the water. For example, with 10 feet of water and a bow roller 3 feet above the surface, the vertical distance is about 13 feet. At a 7:1 scope, you would pay out about 91 feet of rode.
A 5:1 to 7:1 scope can be a useful starting range, but adjust it for the anchorage and conditions. Anchoring advice suggests 7:1 in calm conditions and a longer scope in rougher conditions. Use rode markings or a measured reference to track how much you’ve paid out instead of estimating.
Adjust scope for wind, waves, current, and conditions
Wind, waves, and current can increase the forces on your anchor and rode. When space and the seabed allow, paying out more rode can help keep the pull on the anchor low. But a longer rode increases the area your boat may swing through. Check the distance to nearby boats, shorelines, and other hazards before letting out more.
Watch your boat after the anchor is set. If it strains against the rode, swings sharply, or moves beyond its expected position, reassess the anchoring setup and conditions. Guidance on anchoring in wind and current emphasizes accounting for these forces to reduce the chance of dragging. Follow local anchoring rules, and choose a location with enough room for your boat to swing safely.
Add chafe protection and a snubber or bridle to reduce shock loads
Rope can wear where it rubs against a bow roller, rail, or sharp edge. Use chafe protection at contact points, and inspect it for cuts or thinning. If the rode is under load, keep clear of moving rope and chain while checking the setup.
A snubber connects to the chain and transfers some load away from the windlass while softening sudden pulls. A bridle can distribute the load between two attachment points and may help reduce yawing on some boats. Choose equipment rated for your boat and conditions, and follow the manufacturer’s instructions for fitting it. A snubber can help reduce line stress, but it doesn’t replace the right anchor, adequate scope, or regular inspections.
Mark and stow the rode for safe deployment
Mark the rode at regular intervals so you can see how much has been paid out. Use durable, visible markings that won’t snag in the windlass or damage the rope. Keep a simple record of what each mark means, and make sure anyone who may handle the anchor knows how to read it.
Stow the rode neatly so it can feed out without tangling. Keep the anchor end accessible, and secure the anchor against movement or accidental deployment while underway. Before each trip, confirm that the rode’s bitter end is attached to the boat and that the chain and rope run freely. Routine rode inspections can help reveal wear or connection problems before you need to anchor.
How Do You Anchor a Boat Safely?
Safe anchoring takes more than dropping the anchor and hoping it holds. Check the location and conditions first, prepare the rode so it can run freely, and confirm the anchor has set before settling in. Stay alert while anchored, too: wind, current, and tide can change your boat’s position or put it on a different swing.
Check the seabed, depth, forecast, tide, swing room, and restrictions
Before you anchor, check a chart for water depth, seabed type, hazards, and local restrictions. Sand and mud can provide good holding, while rocks, reefs, and vegetation may make it harder for an anchor to set. Choose a spot with enough room for your boat to swing as wind or current changes, and keep a wide berth from other boats and obstacles. Check the forecast and tide as well. Water depth changes with the tide, which affects how much rode you need. The BoatUS Foundation’s anchoring guide recommends checking bottom characteristics and allowing space around hazards and nearby boats.
Approach slowly and lower the anchor
Prepare the anchor and rode before reaching your chosen spot. Check that the rode can run freely, and keep passengers clear of the line and chain. Approach slowly into the wind or current, whichever has more effect on your boat. Bring the boat nearly to a stop over the point where you want the anchor to set, then lower it from the bow. Don’t throw it overboard. Once it reaches the seabed, ease the boat back while paying out rode. This helps the anchor pull along the bottom at a low angle, allowing its flukes to dig in. Pontoon & Deck Boat Magazine explains why anchor angle matters.
Pay out rode as the boat moves back, then set the anchor with gradual reverse power
Let the boat drift back as you pay out rode steadily. This gives the anchor room to lie along the seabed instead of dropping straight beneath the bow. When you’ve released the planned amount, secure the rode to the bow cleat. Keep the bow facing the anchor, then apply a little reverse power to take up slack and put gradual tension on the rode. Avoid a sudden burst of throttle, which can shock the rode or pull the anchor free before it sets. Watch how the boat responds as the line tightens. Pontoon & Deck Boat Magazine’s anchoring guidance also recommends securing the line at the bow and reversing slowly to set the anchor.
Confirm the anchor holds with visual bearings and position checks
Once the rode is taut, check that your position stays steady. Pick two fixed landmarks on shore and note how they line up. If their alignment changes, your boat may be moving. A chartplotter or GPS can provide another position check, though small readings can vary. An anchor alarm can also help, but it shouldn’t replace looking around. Recheck your position after the boat settles and continue monitoring it while you’re anchored. Boat owners looking for marine navigation equipment can explore the electronics and navigation gear available from Apollo Lighting. GetMyBoat’s anchoring guide warns that assuming an anchor is holding without checking can allow a boat to drift unnoticed.
Watch for dragging and changing conditions
Keep checking your position, the wind, the current, and nearby traffic. A wind shift or tide change can alter the direction of pull or move your boat through its swing. Recheck your bearings and chartplotter after a noticeable change, and make sure you still have room clear of hazards and other vessels. If you suspect the anchor is dragging, start the engine if it’s safe, retrieve the anchor, and reset it in a more suitable spot. Act before the boat drifts close to danger. In a crowded anchorage, account for the rode length and the swing room each boat needs. Clear communication with nearby boaters can help prevent crossed anchor lines and close quarters.
Retrieve the anchor carefully and keep rode clear of the propeller
Before retrieving the anchor, start the engine and check that the area around the boat is clear. Take in rode from the bow while slowly motoring toward the anchor, gathering slack as the boat moves forward. Keep the line and chain well clear of the propeller, and don’t use reverse power if the rode could foul it. When the boat is over the anchor, pull it free and bring it aboard carefully. If it won’t break out, move the boat over the anchor rather than using the engine to haul it loose. Keep hands and feet away from moving rode, then secure the anchor before getting underway. Before deploying, lay out the rode so it can run without tangling, as BoatBlissBlog’s anchoring advice recommends.
Use a trip line where snags are a concern
A trip line can help retrieve an anchor caught on rocks, wreckage, or other obstacles. Attach one end to the anchor’s crown and the other to a small surface buoy. If the anchor snags, pulling from the crown may help free it from the obstruction. Use a trip line only where it won’t create a hazard for other boats, swimmers, or wildlife. Keep the buoy and line visible, and avoid deploying them in busy channels or places where another vessel could run over the line. Check local rules before using one. If the anchor won’t come free, check for fouling and reposition carefully rather than pulling harder with the boat.
What Boat Anchoring Mistakes Should You Avoid?
Anchoring safely takes more than dropping an anchor and letting out a length of rode. Your anchor needs to suit the boat and seabed, the rode must be long enough for the conditions, and the anchor must be set and checked. Wind, current, tide, and nearby boats can also change your position after you’ve settled in.
Before anchoring, check the forecast, water depth, seabed, and any local restrictions. Choose a spot with room for your boat to swing, then keep an eye on your position and surroundings while you’re anchored. Inspect the anchor, rode, and connecting hardware before each trip, and replace worn parts rather than trusting them to hold.
The following mistakes are easy to overlook, especially when conditions seem calm. Taking a few minutes to plan your setup and verify that it’s holding can help you avoid a dragging anchor, an unexpected collision, or damage to your equipment.
Choose an anchor that suits your boat and seabed
Anchors are designed to grip different seabeds, so one that holds well in sand may perform poorly on rock, weed, or soft mud. Consider the bottoms you’re most likely to anchor over, along with your boat’s size and design. Check the anchor maker’s sizing chart and guidance for your expected conditions. If you often visit areas with varied seabeds, carrying a second anchor suited to different conditions may be useful.
When the bottom is unfamiliar, check local charts or ask a boater who knows the area. The GetMyBoat anchoring guide explains why choosing an anchor that doesn’t match the seabed can leave a boat drifting.
Don’t assume more weight or chain guarantees a secure hold
A heavier anchor or a longer chain may seem like a simple way to make your setup more secure, but weight alone doesn’t determine whether an anchor will hold. The anchor must engage with the seabed, and the rode needs to pull at an angle that helps it stay set. Chain can help keep the pull lower and protect rope from abrasion, but it won’t make an unsuitable anchor work on the wrong bottom.
Choose your anchor and rode based on your boat, the seabed, and the conditions you expect. Follow the manufacturer’s guidance rather than adding weight without a clear reason. Boat Ed’s explanation of how anchors work describes why an anchor’s grip matters more than its weight alone.
Pay out enough scope and measure rode length accurately
Scope is the amount of rode you pay out compared with the vertical distance from the bow roller to the seabed. Too little scope can pull upward on the anchor and make it more likely to break free. A 7:1 ratio is often used as a starting point in calm conditions, while rougher conditions may call for more. Treat these figures as general guidance, and account for the forecast, available swing room, and your equipment’s instructions.
Measure the rode carefully, including the water depth and the height of the bow above the water. Don’t estimate by sight alone. The GetMyBoat guide to anchoring mistakes also identifies insufficient scope as a common reason an anchor may drag.
Confirm the anchor has set
A taut rode doesn’t automatically mean the anchor is holding. After paying out enough rode, apply gradual reverse power to help the anchor dig in, then check whether the boat stays in place. Use fixed landmarks on shore as visual bearings and compare your position with your chartplotter or GPS. Check again after a few minutes, particularly if the wind or current is changing.
If the boat keeps moving, the anchor may not have set or may be dragging. Retrieve it and try again rather than relying on an uncertain hold. Boat Ed’s guide to anchor mechanics provides useful background on how an anchor grips the seabed.
Account for wind shifts, tides, swing room, and nearby boats
Your boat may swing around the anchor as wind and current change. Rising or falling tides can also alter the water depth and the angle of the rode. Before anchoring, consider where the boat could move as conditions shift, not just where it sits when you first lower the anchor. Leave room from other boats, shorelines, channels, and hazards.
Don’t assume a nearby boat will swing in the same direction as yours. Different anchor and rode setups can lead boats to move differently. Check the forecast and tide information, then keep watch after anchoring. The BoatsGeek guide to common boating mistakes explains how changing wind and current can cause a boat to drift into danger.
Check rode and hardware for wear, and follow anchoring restrictions
Inspect the entire setup before each trip. Look for frayed or stiff rope, corroded or deformed chain and shackles, and loose or worn connections. Replace damaged parts before relying on them, and secure the anchor so it can’t shift or deploy by accident.
Check local rules before choosing a spot. Some areas restrict anchoring to protect seagrass, maintain clear navigation channels, or preserve sensitive habitats. Use current charts and guidance from the relevant harbor or marine authority, since requirements vary by location. NOAA’s nautical chart resources can help you review chart information, but check local notices and regulations as well. A well-maintained setup and a permitted anchoring location both matter.
What Does Boat Anchoring Cost?
The cost of anchoring includes more than the anchor itself. Your boat’s size, the seabed you use, and the rope, chain, and hardware you need all affect the total. Budget for a complete setup that suits your boat and typical conditions.
Compare prices by anchor type, size, and material
Individual anchors can cost roughly $30 to more than $400, depending on the design, size, and material. Basic models are often less expensive, while larger or specialty anchors may cost more. For reference, the anchor listings at Walmart include a traditional fluke anchor for about $46 and a folding box anchor for around $120. Prices can change, so check current listings before you buy.
Use price as one factor, not the deciding one. Choose an anchor sized for your boat and suited to the seabed where you usually anchor. Check the manufacturer’s sizing guidance and compare options with a marine retailer, such as Apollo Lighting, which serves boat owners and marine professionals.
Budget for chain, rope, shackles, connectors, and other components
An anchor needs compatible rode and hardware to work as part of a complete system. A typical setup includes rope, chain, shackles, and connectors. Complete kits that bundle these parts with an anchor generally cost about $83 to $270 or more, based on the boat anchor listings reviewed for this guide.
Before choosing a kit, check its anchor size, rope length, chain, and hardware against your boat and how you plan to anchor. If you purchase components separately, make sure they are suitable for marine use and fit together correctly. You may also need chafe protection or a snubber. Comparing the kit’s contents with your requirements helps you budget for the full setup.
Weigh price against durability and intended conditions
A heavier or more expensive anchor is not automatically the right choice. Holding depends on factors such as anchor design, boat size, seabed, and whether the anchor sets properly. Fortress Anchors’ guide to anchor myths explains why weight alone does not determine performance and why different designs behave differently.
Start by considering the seabeds you encounter most, such as sand, mud, or mixed terrain. Then weigh how frequently you use your boat and the conditions you may face. A well-matched anchor can be a better investment than a cheaper option that does not suit your usual use. Follow the manufacturer’s sizing and care guidance, and consider how the material will hold up in your boating environment.
Budget for inspections, maintenance, and a backup anchor
Include routine checks in your anchoring budget. Inspect the anchor for damage or bending, look for corrosion on chain and hardware, and check rope for fraying. Rinse the system after use, and replace components that show significant wear. Regular inspections help you catch problems before they affect a trip. Anchoring safety guidance also recommends checking your setup and avoiding common anchoring errors.
A backup anchor adds to your initial costs, along with the rode and hardware it needs. Consider whether a second anchor suits your boat and typical trips, especially if you encounter different seabeds or conditions. Store it securely, and inspect it alongside your primary setup so it is ready when needed.
How Do You Maintain and Store a Boat Anchor?
Routine care helps keep your anchor and rode ready when you need them. After each trip, rinse and inspect the gear, then stow it securely. Before heading out again, check that every part is in working order.
Rinse and inspect the anchor, chain, and rope after use
After retrieving the anchor, rinse it, the chain, and the rope with fresh water to remove salt, sand, mud, and other debris. Salt can contribute to corrosion, while grit can wear rope fibers and collect around connections. Pay special attention to joints and to the sections of rode that passed through the bow roller or rested on the seabed.
Let the equipment drain and dry where practical before stowing it, especially if it will be kept in a closed locker. As the BoatUS Foundation’s anchoring guidance recommends, make rinsing part of your post-trip routine. If cleaning reveals damage or unusual wear, address it before using the system again.
Check for corrosion, deformation, fraying, and worn connections
Once the gear is clean, inspect the anchor for cracks, bends, or changes to its shape. Check the chain for corrosion and damaged links, and examine the rope for fraying, cuts, stiffness, or worn sections. Look closely at shackles, swivels, and other connectors. A loose pin or worn connection can compromise the system even when the anchor itself looks sound.
Replace damaged components rather than relying on them for another trip. If you are unsure whether a part is still serviceable, check the manufacturer’s recommendations or ask a marine professional to inspect it. America’s Boating Club’s anchor safety tips also advise checking the anchor and rode for corrosion, deformation, fraying, and worn connections.
Secure the anchor and rode against movement or accidental deployment
Stow the anchor in a designated locker or holder that keeps it from shifting as the boat moves. Secure the rode so it cannot spill out, snag nearby equipment, or become tangled. The anchor should be restrained against accidental deployment, but its release should remain accessible when you need to use it.
Check that the anchor sits correctly in its roller or storage position, and inspect any retaining pin, strap, or other restraint for wear. A loose anchor can damage nearby surfaces or equipment, while an unsecured rode can create a hazard on deck. The Floating Fender guide to anchoring errors also recommends securing the anchor and rode to prevent movement or unintended deployment underway.
Check the entire anchoring system before each trip
Before leaving the dock, check the full system: anchor, chain, rope, shackles, connectors, and storage restraints. Confirm that the rode is clear, connections are secure, and you have enough line for the depths and conditions you expect. If you carry a spare anchor, inspect its gear too.
Pay particular attention to equipment that has been stored for a while or used in demanding conditions. Repair or replace questionable components before departure, rather than waiting until you need the anchor to hold. Discover Boating’s guidance on common boating mistakes recommends checking the anchor, chain, and rode before each trip to make sure they are in good working order.
Frequently Asked Questions
What type of boat anchor should I choose?
Start with the seabed you use most often, then check the anchor maker’s sizing guidance for your boat. Fluke anchors are often suited to sand and mud, while plow, wing, and claw designs may work across a wider range of bottoms. Also confirm that the anchor fits your bow roller or locker.
How much anchor rode should I let out?
Calculate scope using the vertical distance from the bow roller to the seabed, including the bow roller’s height above the water. A 5:1 to 7:1 ratio can be a starting point in calm conditions. Adjust for wind, current, tide, available swing room, and your equipment’s guidance.
How can I tell if my anchor is holding?
After setting the anchor with gradual reverse power, watch two fixed landmarks and check your GPS or chartplotter. Recheck your position after the boat settles and whenever wind or current changes. If the boat keeps moving, retrieve the anchor and set it again.
Should I carry a second anchor?
A spare can be useful if you visit different seabeds, anchor in changing conditions, or want backup equipment. Choose one suited to your boat and intended use, and make sure you have compatible rode and secure storage for it.
How often should I inspect my anchoring gear?
Check the anchor, rode, chain, shackles, and connections before each trip. After use, rinse away salt and debris, then look for corrosion, bends, fraying, or worn parts. Replace damaged components before relying on the system again.